[SOLVED] Problem adding USB host device to KVM Windows guest machine.
Windows machine guest info
Description of problem:
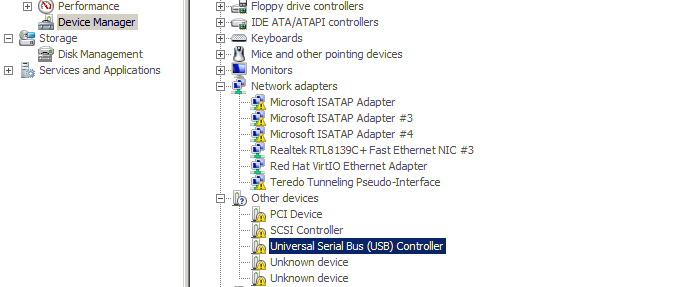
Trying to add USB host device – storage and eToken to KVM Windows 7 32 and 64 bit (also Windows XP 32 and 64 bit) guest. No luck. It looks like Windows 7 see something on the bus, but the device is not functioning inside of the guest operating system. Sometimes device in the guest operating system doesn’t even appear.
Version-Release number of selected component (if applicable):
Fedora 16, Debian 8,9, Ubuntu, Gentoo, Arch Linux and Manjaro Linux.
USB flash device and/or functional eToken device should appear.

How reproducible:
Start Windows KVM machine, add USB
Steps to Reproduce:
1.Start Windows 7 guest using Virtual Machine Manager
2. Add Hardware in “Virtual Hardware Details” part
3. Choose USB host device and select for USB flash drive.
4. Apply
Actual results:
Correct functional device appears in Windows 7 guest
Expected results:
Additional info:
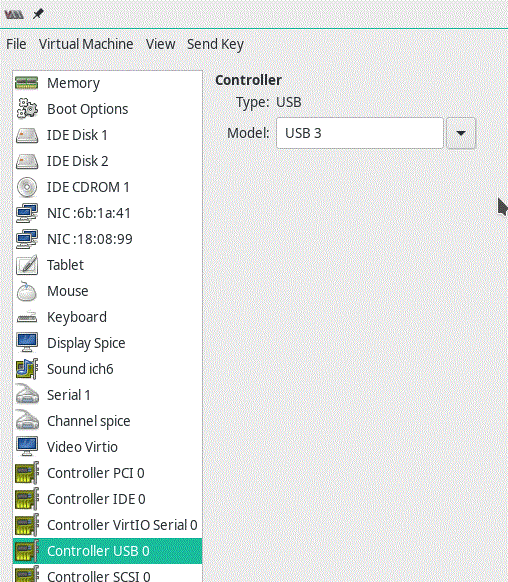
Mentioned configuration worked fine in Fedora 14 using KVM, Windows 7, and eToken USB token. I guess it’s somehow connected with USB 3.0 integration in QEMU.
Windows 7 (32-bit)
Windows 7 (64-bit)
Windows Vista (32-Bit)
Windows Vista (64-Bit)
Windows XP (32-bit)
Windows XP (64-bit)
This package installs the software (USB 3.0 driver) to enable the following devices.
– Electronics USB 3.0 Host Controller
– Electronics USB 3.0 Root Hub
Notes:
Refer to marketing materials to find out what computer models support which devices.
If this package has been installed, updating (overwrite-installing) this package will fix problems, add new functions, or expand functions as noted below.
This program is language independent and can be used with any language system.
Revision : 01
——————————————————————————–
Software name USB 3.0 Driver
Support models ThinkPad T420, T420i, T420s, T420si
ThinkPad T520, T520i
ThinkPad W520
ThinkPad X1
ThinkPad X1 Hybrid(*1)
ThinkPad X220, X220i, X220 Tablet, X220i Tablet
Operating Systems Microsoft Windows 7 32-bit, 64-bit
Microsoft Windows Vista 32-bit, 64-bit
Microsoft Windows XP Professional x64 Edition SP2
Microsoft Windows XP Professional SP3
Refer to marketing materials to find out what computer models
support which Operating Systems.
Version 2.1.36.0
Support devices Renesas Electronics USB 3.0 Host Controller
Renesas Electronics USB 3.0 Root Hub
*1: Supports Windows 7 64-bit only.
——————————————————————————–
WHAT THIS PACKAGE DOES
This package installs the software (USB 3.0 driver) to enable the following
devices.
Device name in the Device Manager
——————————————-
Renesas Electronics USB 3.0 Host Controller
Renesas Electronics USB 3.0 Root Hub
Refer to marketing materials to find out what computer models support which
devices.
If this package has been installed, updating (overwrite-installing) this
package will fix problems, add new functions, or expand functions as noted
below.
This program is language independent and can be used with any language system.
——————————————————————————–
CHANGES IN THIS RELEASE
Version 2.1.36.0
[Important updates]
Nothing.
[New functions or enhancements]
Nothing.
[Problem fixes]
– Fixed an issue where the driver was not updated from version 2.0.32.0.
——————————————————————————–
DETERMINING WHICH VERSION IS INSTALLED
[Windows 7/Vista]
1. Click Start.
2. Right-click Computer, and then click Properties.
3. At the left pane, click Device Manager.
4. Double-click the Universal Serial Bus controllers category.
5. Double-click either of the following devices.
Renesas Electronics USB 3.0 Host Controller
Renesas Electronics USB 3.0 Root Hub
6. Click the Driver tab.
7. Check Driver Version.
[Windows XP]
1. Click Start.
2. Right-click My Computer, then click Properties.
3. Click the Hardware tab, and then click Device Manager.
4. Double-click the Universal Serial Bus controllers category.
5. Double-click either of the following devices.
Renesas Electronics USB 3.0 Host Controller Driver
Renesas Electronics USB 3.0 Root Hub
6. Click the Driver tab.
7. Check Driver Version.
——————————————————————————–
NOTES
Nothing.
——————————————————————————–
INSTALLATION INSTRUCTIONS
Note:
– If your computer runs satisfactorily now, it may not be necessary to update
the software. To determine if you should update the software, refer to the
Version Information section.
Manual Install
This section assumes to use Internet Explorer and Windows Explorer.
Downloading file
1. Click once on the underlined file name. Once this is done, some pop-up
windows will appear.
2. Follow the instructions on the screen.
3. In the window to choose Run or Save, click Save.
4. Choose the folder you would like to download the file to and click Save.
A different window will appear and the download will begin and complete.
Once the download has completed, there may or may not be a message stating
that the download completed successfully.
Extracting file
5. Make sure to be logged on with an administrator account.
6. Locate the folder where the file was downloaded.
7. Locate the file that was downloaded and double-click it.
8. Follow the instructions on the screen.
9. In the Select Destination Location window, click Next. If you would like to
select a different folder, click Browse.
10. In the Ready to Install window, click Install. All the necessary files will
be extracted to the folder selected in the step 9.
Installing files
11. Make sure the checkbox next to “Install ….. now” is checked and click
Finish.
12. Follow the instructions on the screen to complete installation and restart
the computer.
Finally delete the file saved in the step 4.
Unattended Install
This is for system administrators’ use only.
1. Refer to the Manual Install section, and download and extract the file.
2. In the step 11 of the Installing files section, uncheck the checkbox next
to “Install ….. now”, and then click Finish to cancel installation.
3. At the command line, execute SilentInstall.bat
Example: [Path where the files were extracted]\SilentInstall.bat
LIMITATIONS
Nothing.


