


spectre and meltdown
How to check if your PC is protected against CPU vulnerabilities
In order to verify that you’re protected against the latest microprocessor security vulnerabilities, you can use a PowerShell script created by Microsoft:
- Open Start.
- Search for Windows PowerShell, right-click the top result, and select Run as administrator.
- Type the following command to install the required module and press Enter:
Install-Module SpeculationControl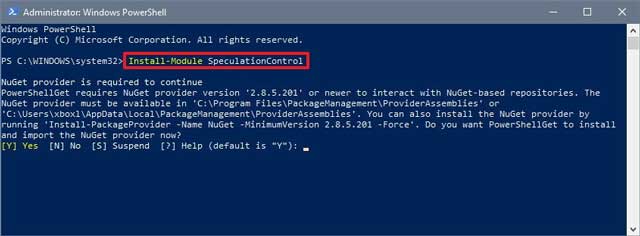
- ype Y and press Enter if you’re prompted to enable NuGet provider.
- Type Y and press Enter if you’re prompted to confirm the installation from an untrusted repository.
- Type the following command to save the current execution policy so it can be reset and press Enter:
$SaveExecutionPolicy = Get-ExecutionPolicy - Type the following command to ensure you can import the module in the next step and press Enter:
Set-ExecutionPolicy RemoteSigned -Scope Currentuser - Type Y when prompted to confirm the execution policy change and press Enter:
- Type the following command and press Enter:
Import-Module SpeculationControl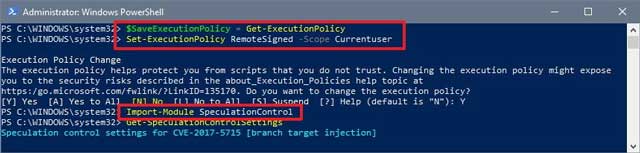
- Type the following command to check if your device has the necessary updates and press Enter:
Get-SpeculationControlSettings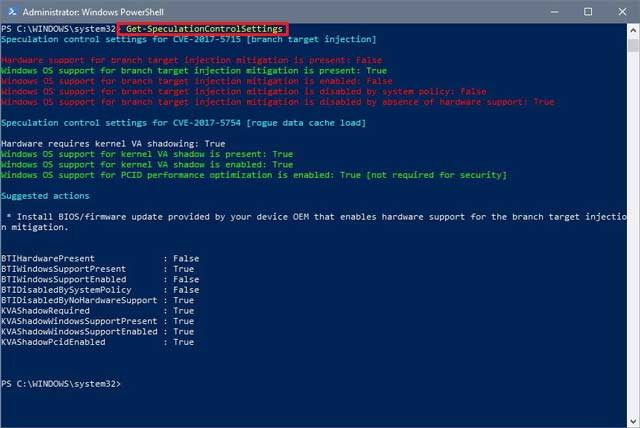
Once you completed these steps, you’ll be able to determine whether or not your computer is still vulnerable to the Meltdown and Spectre security flaws.
If your machine only has the emergency patch for Windows 10 installed, which only addresses the Meltdown vulnerability, then you’ll see all the requirements for “rogue data cache load” (Meltdown) set to True and highlighted in green.
Also, under the “branch target injection” (Spectre) only the software mitigation is present and set to True, but it won’t show up as enabled if your device doesn’t have the latest Basic Input/Output System (BIOS) or Unified Extensible Firmware Interface (UEFI) update from your hardware manufacturer.
Only after installing the emergency Windows 10 update and the required version of the BIOS or UEFI update will all the requirements under “branch target injection” and “rogue data cache load” be set to True and highlighted in green, indicating that your device is protected.
After you’re done verifying the state of your device, type the following PowerShell command Set-ExecutionPolicy $SaveExecutionPolicy -Scope Currentuser to roll back the execution policy to the original state and press Enter, and then type Y and press Enter to confirm the reset.
How to protect your PC from CPU vulnerabilities
Windows Update
The update that helps to mitigate the security vulnerabilities should install automatically, but if after running the PowerShell script, you notice that your device isn’t protected, there could be a problem with Windows Update or there could be an antivirus conflict.
While creating the latest patch for Windows 10, Microsoft found that some antivirus solutions may cause a Blue Screen of Death (BSOD) that will prevent a device from starting. As a result, if you’re running an unsupported third-party antivirus, Windows Update won’t download and install the mitigation for the vulnerability.
If your computer isn’t getting the update, visit your antivirus company’s support website to find out if a new software update is available and follow thr instructions to apply it.
In the case that the antivirus doesn’t have the patch to address the compatibility issue with Windows 10; you can temporarily uninstall the third-party antivirus. (Although, it’s not recommended to keep your computer unprotected, remember that as you uninstall the third-party malware solution Windows Defender Antivirus will enable automatically.)
Uninstalling security software should be a straightforward process, but it’s always a good idea to check your software company support website for specific instructions before using the steps below:
- Open Settings.
- Click on Apps.
- Click on Apps & features.
- Select the antivirus.
- Click the Uninstall button.
- Click the Uninstall button again.


